| MULTIMEDIA |
| AVIedit |
| AVIFrate |
| AVIDiag |
| Album3D |
| WEB TOOLS |
| Logalizer |
| Snowflake |
| Snowflake II |
| AM software |
| News |
| About us |
| Mirrors |
| Links |
 |
AVIedit | Album3D | Web tools | Forum | Links |
| Download | Logalizer | ||||
| Order | Snowflake | ||||
| Support |
|
Copyright 2000, 2009 Alexander Milukov, All rights reserved Creating "fades" in AVIeditWhat is the "fade" ? It is an impressive video (and audio) effect that allows you to make nice transitions from one piece of your clip to another. When you arrange your family videos, you probably have noticed that they have some not very interesting scenes, so cutting these would be really nice. Assume you did the cuts... But now you have even a stronger problem to solve. If you simply join these edited parts of video, the result looks jerky as like the heap of disconnected LEGO puzzles. It's time to add few fades between clips.Lets begin. For a training purposes we will "connect" two still image clips and add some music to them, finally creating an avi file. I've taken two well-known pictures, they have a bit different width and height, but this is not a big deal. You can use your own photos, video frames exported or video clips you may have.   Step 1Start AVIedit and click Edit/Timeline or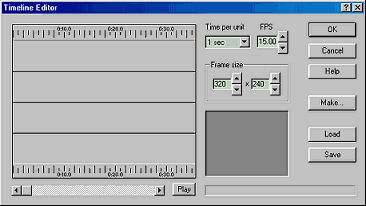 At left side of the editor window you see the frame with two rulers, on top and on bottom of it. They are marked with time units. You can change the time scale for better views using the dropdown list at right side. Step 2Add first image by right mouse button click somewhere in the timeline. Context menu appears and you need to choose Add Image item as shown below. Step 3Now you see an Image Browser window that lets you preview and finally select an image you'd like to add to timeline.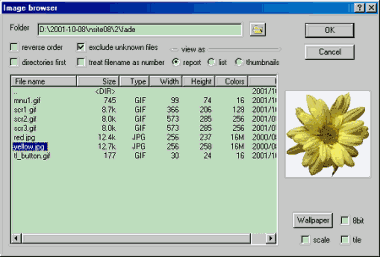 Step 4Add second image using the same way as you did for first time.Step 5Align images to make them overlapped a bit. Left button click with SHIFT key pressed starts the movement mode. You can change the clip placement and leave the movement mode by left mouse button click. To assign some transition effect, move the mouse inside the overlapped area and when this area gets outlined, click left mouse button. You will see a dialog box that lets you to choose an effect and some its options.Maybe it is really hard to read about this. Please download one of these two files and play training.avi file to see what exactly I meant. training.avi 400K ready to playback training.zip 85K requires WinZip or pkzip to unpack avi file first Step 6Now add some music to the video clip. Place the mouse below the leftmost picture and click right button. Choose Add sound and locate an appropriate wav file. It should be uncompressed PCM .wav file. AVIedit will resample 22 to 44 kHz, 8 to 16 bits on the fly. No special care is required. To cut off the piece of sound you do not like, first split the audio track using CTRL+left mouse button click. Then delete the piece you do not like, using right mouse button click (context menu).Step 7It's final step. It would be worth to save the project we just made. Click Save button and enter some name here. This will save the current project state to HDD. Next time you'd use Load button to get the project for some further editing.Of course, it's time to write out the movie. Click Make button, specify a new avi file name and few make options. Next you'll be asked about a compressor, and you'll need to relax a bit, while the hourglass cursor tells you AVIedit is busy with your clip rendering. I have selected DivX MPEG4 video codec and have set the bitrate to 360 kbps. Here is the sample (146 kbytes DivX encoded). That's all! You may ask, what if the picture size is smaller than a movie frame ? It is not a big fault! Look... Hit the right mouse button to first image clip. You will see its context menu. Choose Properties and check scale to fit frame option. Repeat this with second image clip, too. Happy fading ! |
Copyright 2000, 2009 AM Software