| MULTIMEDIA |
| AVIedit |
| > download |
| > register |
| > get support |
| > forum |
| > readings |
| > FAQ |
| AVIFrate |
| AVIDiag |
| Album3D |
| WEB TOOLS |
| Logalizer |
| Snowflake |
| Snowflake II |
| AM software |
| News |
| About us |
| Mirrors |
| Links |
 |
AVIedit | Album3D | Web tools | Forum | Links |
| Download | Logalizer | ||||
| Order | Snowflake | ||||
| Support |
MPEG1 to AVI conversion using AVIeditMPEG is a file format by Motion Picture Experts Group. It compresses video files effectively due to keyframe-based (temporal) compression, producing VHS quality (for MPEG1). However it is unsuitable for editing and currently suboptimal for both delivery and final production in comparison to MPEG4 compressed avi files. Using AVIedit built-in MPEG1 to AVI converter you can get both problems solved.How do you run it? In AVIedit main menu, select MPEG converter. 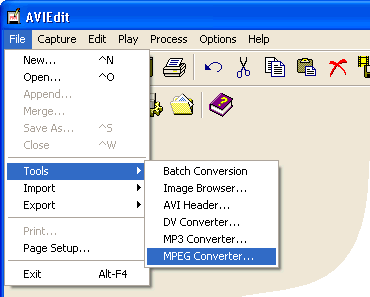 You will see a dialog box window. You can either type in the source mpeg file name manually, or drag and drop the file into this window, or use browse button to select a file. Also you need to specify an output avi file name. 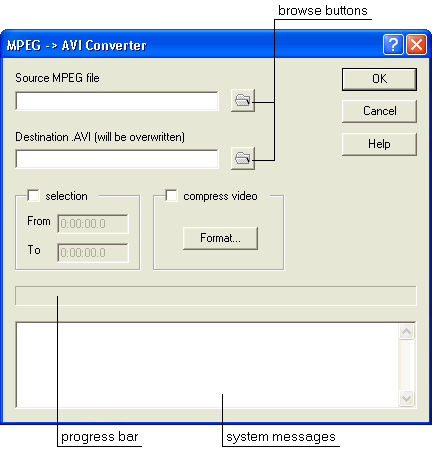 Next optional step is, choose an appropriate video compressor. There are a few pros & contras on this matter.
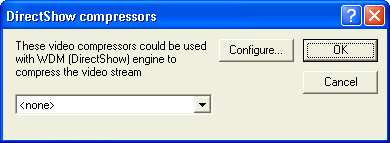 For simplicity, we choose Motion-JPEG compressor which is de-facto standard for video editing. 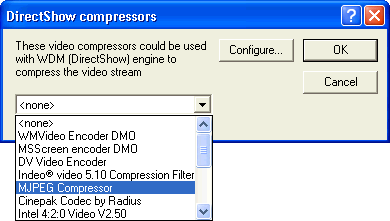 Now your dialog box looks like the picture below and you're ready to go. 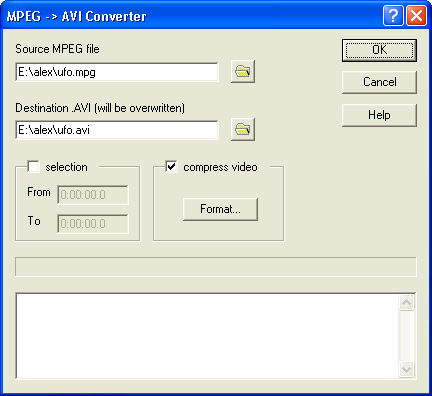 Sometimes you may wish to cut off a few beginning and ending frames of your mpeg file. This can be done at the same run, if you fill in optional selection fields and check in the box. 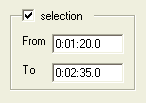 In the sample above, only the first 75 seconds of the source, starting from 1 min 20 sec, will be converted and written to the output avi file. Of course the written file will be much smaller than entire clip. Finally you click Ok button and see the picture like one below. 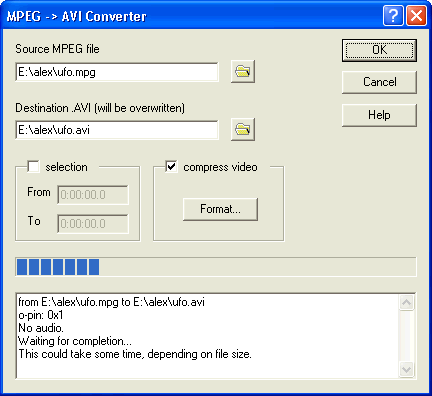 Please note that dialog box will close automatically when conversion is done. Progress bar might show some inaccuracy so please do not worry about that. If conversion does not start (no hard drive activity) and no progress bar steps visible, you're expected to read system messages area and try to solve the problem. For example, if you try to write to read-only media like CD-ROM or r/o network resource, change the file path and click Ok again. If you can not determine why error occurs, you can send us an e-mail (please copy the error messages you got, do not send screenshots, and give us all possible information about your mpeg file). Sometimes conversion stops early due to MPEG stream errors. Often this occurs for broken downloaded mpegs. Generally, you can not fix the broken mpeg file unless you have a chance re-download it new. However, using the selection feature, you can convert the second piece of a file (past the time of broken video frame or audio data) and then join the two avi pieces together using (guess what?...) of course AVIedit ;) Happy converting. |
Copyright 2000, 2009 AM Software